Thursday, November 15, 2012

Let's get all cozied up!!! It's chilly outside!


Hello Crafty Friends,
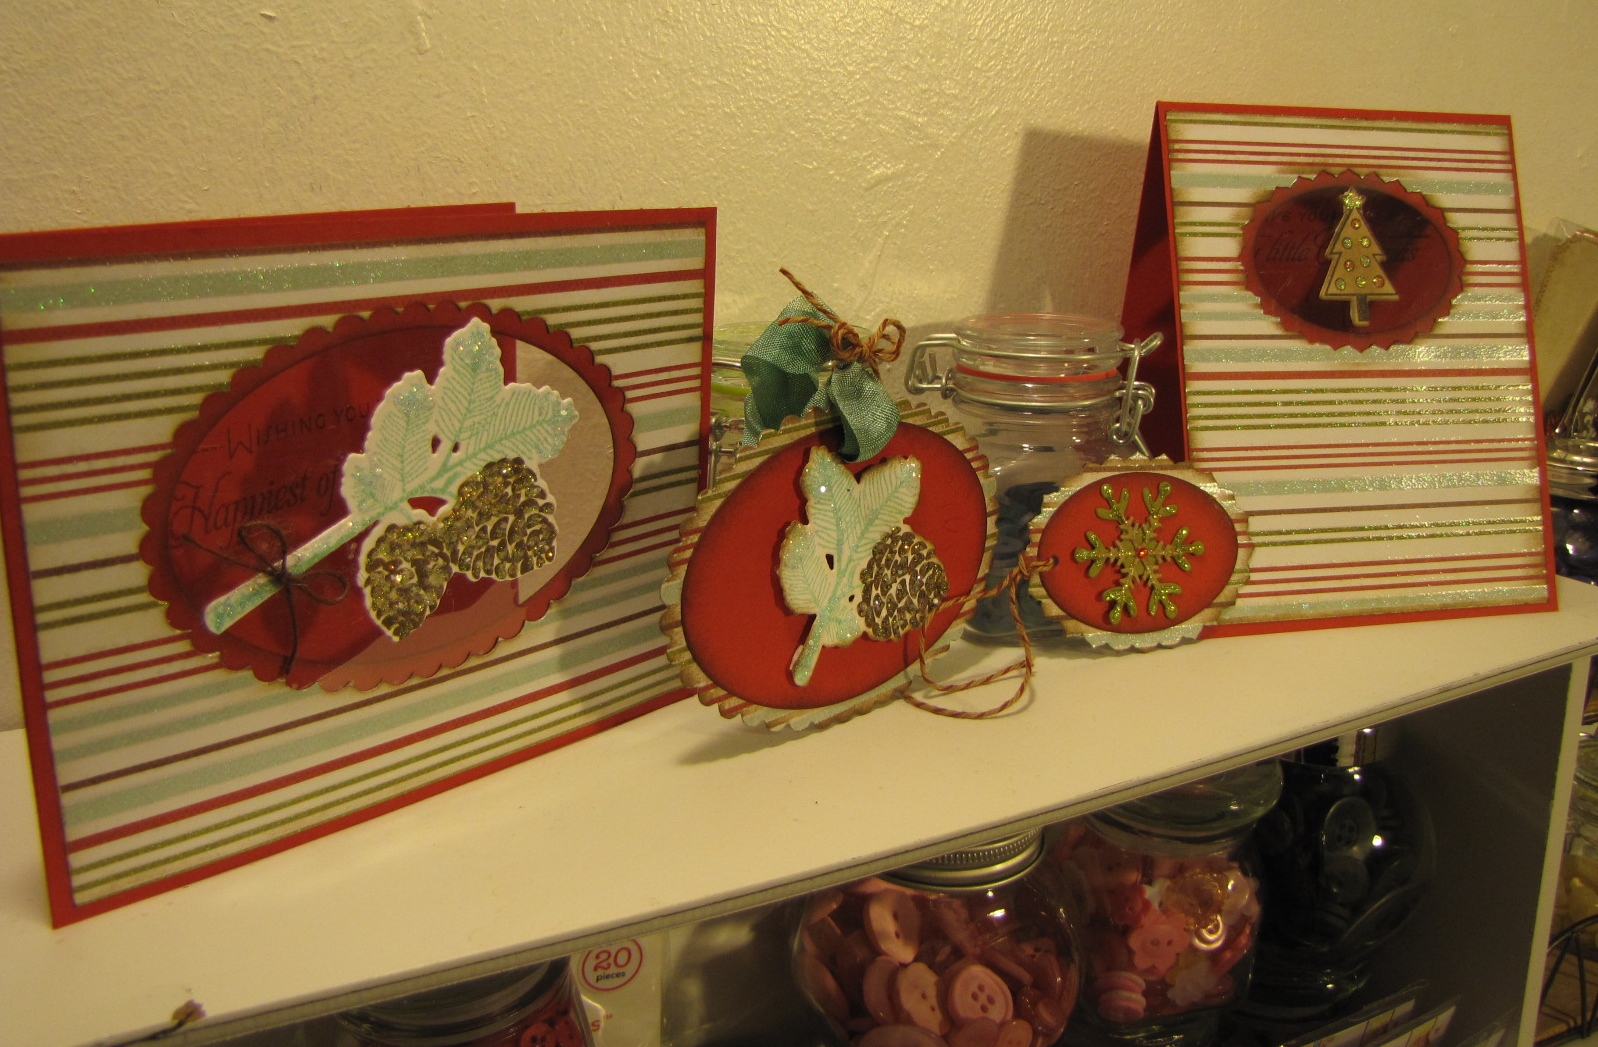
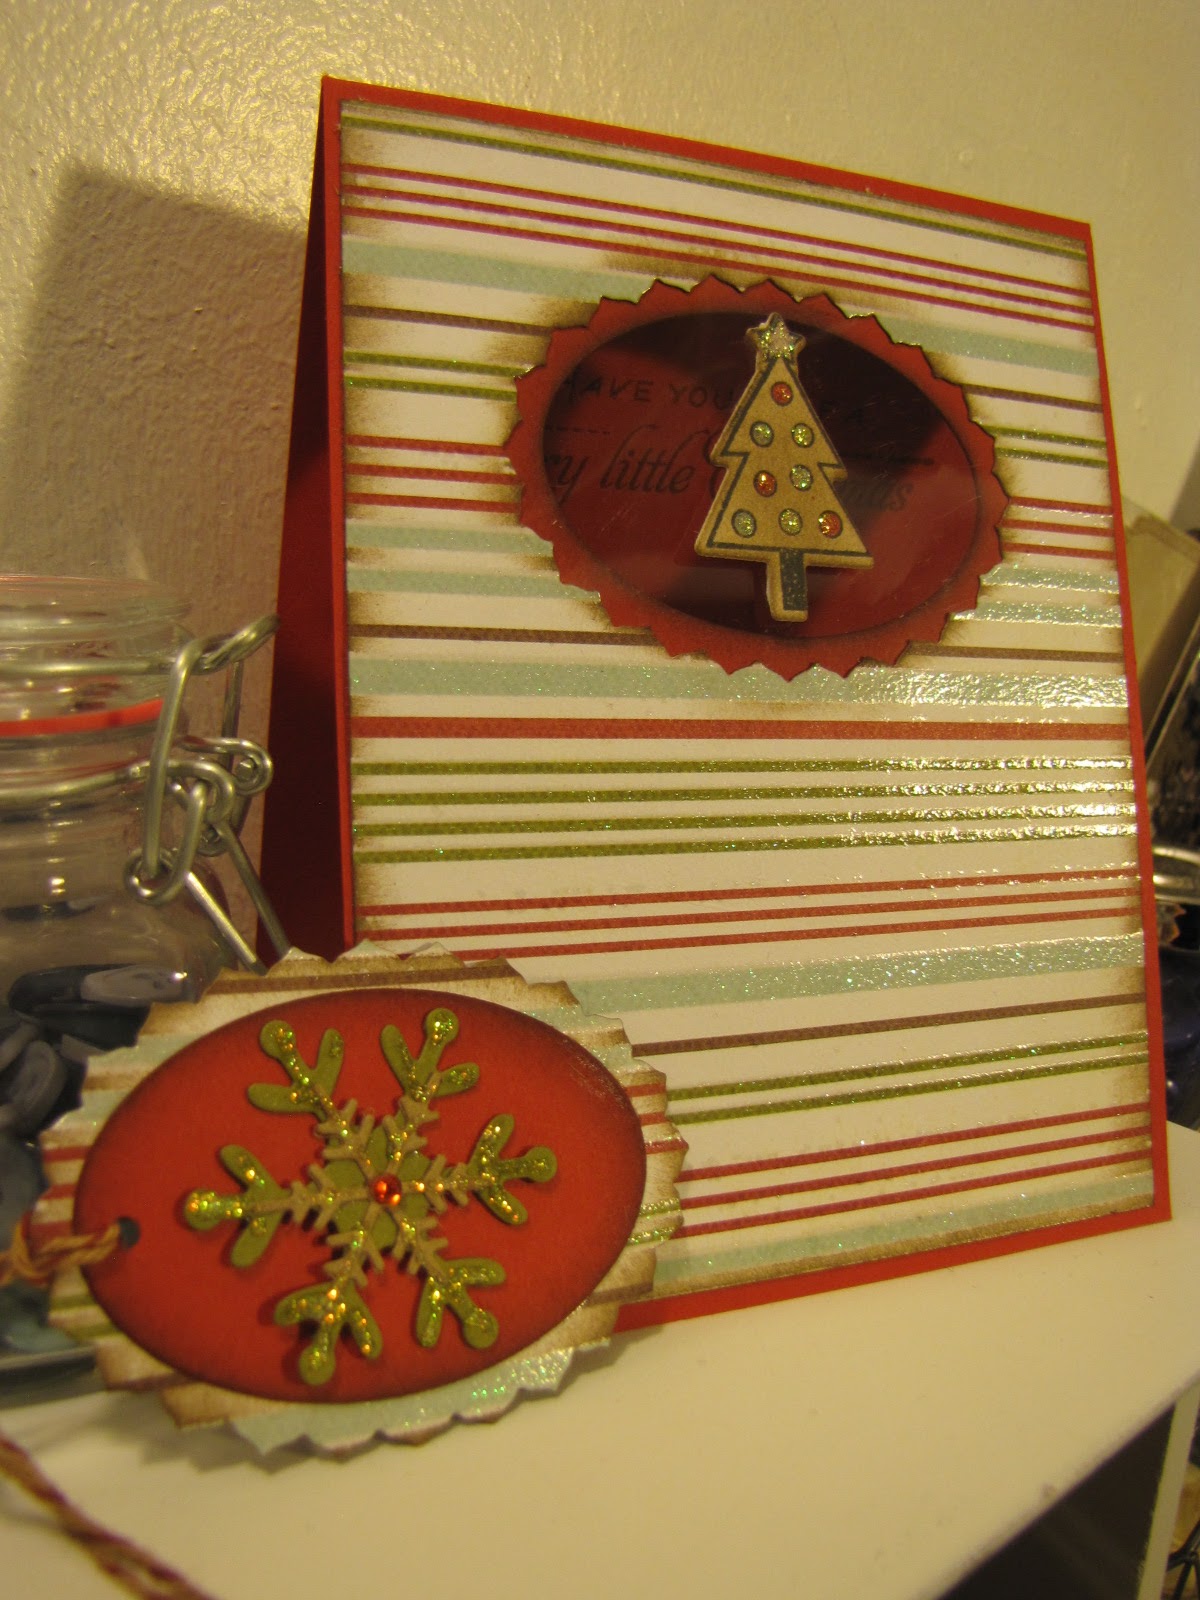
Here with a card for Make it Monday #91 - Faux Pockets.  I whipped up a quick card on this chilly autumn evening while my son took a break from his homework.  Today I decided it was time to dig out my mittens, gloves, and hats here in Seattle.  It is getting a wee bit too cold to be without them around here.  Now if it would just snow!  I was born here in Seattleland but was raised until 8th grade in Glen Ellyn, Illinois.  And I must say while I love most of our Seattle weather I do crave a wee bit of snow in the winter.  The nice thing about living here is that you can find snow pretty much all year long just by driving into the mountains.  But I also like to have some in the city - a few snow days, some snow cream, a reason to break out the sleds with the neighbors etc.!  But, alas, I digress...onto my card....it was inspired by the mittens I pulled out today for winter.  I decided to grab my Love Lives Here Christmas Dies and create this:


Thanks for taking a look at my card!  I am off to Nichole's blog to peek at what other's have made!  It is always so fun to see all of the beautiful projects! 
                                     :) Jill

Card Recipe:
Stamps:  Happiest of Holidays and In the Meadow - Papertrey Ink
Paper Products: Papertrey Ink; Amuse (Twas the night paper) and My Mind's Eye
Dies/Impression Plates: Papertrey Ink - Love Lives Here Christmas dies; Peace Be Still Impression plate; Tag Sale #6; Cheery Lynn Designs: Heart die
Other:  Ribbon: May Arts 1/8" red velvet ribbon; Trendy Twine - Krazy for Kraft; glue dots, dimensional tape, button, Martha Stewart Heart Punch


Saturday, November 10, 2012

A departure from cards for one night...

Hello Friends,
Tonight's post is a departure from card-making.  A week or so ago my little boy Tim said to me, "Mommy, why don't you ever take pictures anymore?  And why don't you make scrapbook pages for me anymore?".   My heart almost broke as I realized after talking with him a little that he misses my taking our special family moments and putting them down on paper with my little notes and thoughts.  I used to do this often from Tim's birth right up until Stuart became so ill and my time and energy were needed so much elsewhere.

So I have made an effort to start taking photos again.  A few here and there to record our lives as they continue to go on.  And tonight I took some of our photos from "Halloween-time" and made a scrapbook page.  The photos are of Tim and I picking out our pumpkins for "Jack-o-lantern carving night 2012" which is a tradition in our home usually occurring the Sunday afternoon before the big day.

This year was our first Halloween without Stuart.  He was always very excited to carve a scary pumpkin each year and we always took pictures in our kitchen as we happily created our Jack and Jill-o-lanterns.  I have many memorable moments of our Halloween's together including these photos from 2010...


I caught Tim in mid-flight by having him jump on our bed!  Then I added the caption and sent this to both Grandparents!
 
Anyway....here is the page I made tonight...not my best work but I do like the photos I took a couple Saturday's ago....including a self-portrait of Tim and I that I took by holding the camera out in front of us.


Thanks for taking a look...have a good night.
:) Jill and Tim
 

Friday, November 9, 2012

I love Snowmen! And Snow Angels! And Snow Babies....


Hello Friends,
Here tonight with a couple more Christmas cards.  These were made using another stamp from Serendipity Stamps that is new to their Holiday line up this year.  It is a beautiful snow angel holding a glowing star!  You can see (and purchase) the stamp:  HERE!

And here are some additional photos of my cards:


I hope to have time to re-take the photos during the day.  It has been cloudy the past few days here in Seattle and it is difficult to get good light for photo taking.  I used extra lighting but it just isn't the same as some good daylight.  I am posting anyway because I have a very busy weekend ahead of me and may not be in my craft room again until next week!  Happy Weekend everyone!
                                      :) Jill

Cloud 9: November Blog Hop


Hello Friends,
Today is the day of the Cloud 9 Blog Hop for November 2012!  Yeah! 
Here is the yummy inspiration photo:


I had a ton of ideas bouncing around in my head after seeing this photo.  I was inspired by the windows and the trees inside and I got the idea of creating a card where the person would be viewing the Christmas Tree through a window.  Each year at Christmas time we always place our tree in the main living room window so that the neighbors can see it each evening when I turn the lights on. 
The idea of seeing the Christmas Tree through the window was the inspiration for this card:

I used some clear acetate to back the opening I made with the largest pinking squares stacklets die from WPlus9..  After looking at the beginning stages of my card I decided I needed a "window frame" in a creamy paper to offset or balance all of the red.  Since I had already used the largest stacklet die from WPlus9 I had to improvise and pulled out my Spellbinders pinking squares dies to create one. 

I then stamped and hand cut the tree (I don't have the die yet as it is sold out) and then stamped and hand-cut a second heart and popped it up with some foam tape. I layered it onto the largest WPlus9 stacklet die cut from some Crafty Secrets CD#3 red music paper I printed at home.  (Love this as I never run out of it!).
I used the Folk Art Flurries stamps to add some kraft ink snowflakes to the card front and then placed the beautiful sentiment from Pretty Patches Tree and colored in some of the letters with a copic marker. A Magnolia border strip of green cardstock was added along with a 1/8" border of May Arts velvet ribbon.
A little bit of diamond stickles on the faux "window sill" finishes the card!  You know me I have to have a little glitter on all my Holiday cards!

Thanks for taking a look at my card!  I am excited to see what others make!  I might need to make another card so I can incorporate some of the other colors in the inspiration photo!  I still have so many ideas in my head!  Happy hopping everyone!
:) Jill


NOTE:  The border diecut is from a Magnolia Stamps border die that has been discontinued. If you are interested in this type of product BlueMoonScrapbooking.com has a wonderful selection.


Wednesday, November 7, 2012

Silent Night, Holy Night....

Hello,
I am starting to steal a few minutes here and there to work on Christmas cards and tags as we are into November and the time really does start to fly by.  I sent a bunch of cards and tags home with my sister Beth who was visiting from Oregon and forgot to take any pictures of what I created.  Oh well.

Tonight I wanted to play with a nativity silouhette 4x4 die from Cottage Cutz.  Here is the card that I made in just a few minutes tonight and it would be easy to reproduce to send to many.  I plan on giving it to the Pastor at my church who has been so kind to my family and performed Stuart's Funeral Mass back in February.  Thanks for taking a look at my card!  I have been enjoying seeing so many holiday cards starting to be posted on everyone's blogs in the last few days or so.  This is such a fun time of year to be creative....well really any time of year is fun for creativity!

 I die cut the nativity die from the center of the card base.  I then embossed the dark blue cardstock base with the "old parchment" embossing plate from Cheery Lynn Designs to give it some lovely texture.  Next I cut out a nativity silhouette die cut in white.  I then backed the opening in the cardbase with some double sided paper with "starlight" on it in yellow and white.  Once this paper was in place I glued the white nativity silhouette die cut into the opening.   I placed a portion of the semtiment in the center of the nativity silouhette die cut on the front of the card by masking it.  The full sentiment says "Silent Night, Holy Night". 
   I then worked on the inside of the card.  I first placed the second half of the sentiment - "Holy Night" - on the inside of the card on the left hand side.  I added a second sentiment to the right hand side.  (Note: Just click on the pictures if you want to see a bigger photo)
To finish the card I added some stickles to the star, the stable and the halos on each of their heads. Then a nice blue and white twine bow on one end. This is a beautiful card in person and very simple to make!  I love that!

Thanks for taking a look!
:) Jill

I tried to link to the Nativity Silhouette die but the website of the store was down tonight.  I purchased mine from The Scrapping Cottage which should come up if you do a search.


Sending Thanksgiving Blessings....


Hello Friends,
Here today with a card for this week's Cheery Lynn Designs Challenge #53 - Give Thanks.

I love Cheery Lynn Designs challenges and their beautiful purple dies.  I have my eye on some of the dies from their newest release including a beautiful angel that looks like this:


This is the Lacey Angel die and I think it is gorgeous!!!!  I just love angels and have so many angel friends and family members in my life that I know this die would get a lot of use by me!  It may become a Christmas gift to myself this year!

For today I decided I wanted to use their beautiful embossed leaf and acorn dies and incorporate them into a Thanksgiving card for my parent's who are once again hosting this year with a lot of help from all of us 7 kids and families.

I decided to go with a negative die cut panel and insert the leaf /acorn die cuts into it.


My die cut panel is a frame die from Cheery Lynn Designs called "Fiona's Magic Mirror".  I think it is just beautiful and perfect with these leaves and a little bit of wild honey distress ink on it to brighten up the edges of the kraft cardstock! 


 To balance out the yellow on the card I added a small scalloped circle die from Cheery Lynn Designs with my sentiment.  The sentiment is from a Papertrey Ink Stamp set called: Autumn Hills.
I then added a yellow ribbon and some roses to create a triangle of yellow on the card.  I distressed the edges of my yellow and light brown cardstocks and then used my 1/8" corner chomper from We R Memory Keepers to slightly round the edges.   I took my pictures outside today but it was still gray and overcast here in Seattle so the colors are not perfect....but it will have to do for today!
 
Thanks for taking a look at my Thanksgiving card.  It is hard to believe that it is only 3 weeks away now!  My son loves making cut-out turkey and leaf shaped cookies each year so we may start on those this weekend and freeze the cookies to be frosted just before the big day! 
 
Happy Crafting and cooking all!
: )  Jill
 
Here are some links to products mentioned in my post:


Tuesday, November 6, 2012

Believe in the MAGIC....


Hello Friends,
I made another card for this weeks Waltzing Mouse Sketch Challenge #122. I gained inspiration from the many wonderful cards made by the designers and from several Holiday based Waltzing Mouse stamp sets as well as a new Santa stamp that I recently purchased from Serendipity Stamps: HERE

Here again is this weeks sketch:


I had fun making this card and was inspired by Renee who made a card with a Santa silouhette and the colors black, red, and cream.  You can see her card on her blog "It's a Patchwork Life":   HERE.  I ended up using the colors black, red, white and silver on my card. 

 I love this sentiment "Believe in the magic..." and wanted to give a special card to my son who is being shall was say "challenged" in his Santa beliefs this year.  The picture doesn't show it well but the snowflakes stamped over the "Twas the night before Christmas" poem are done in silver while the poem was in white.

I added some glossy accents to Santa's glasses so they look more real and created a reindeer border with the sweetest little stamp from Waltzing Mouse's Holiday Ornaments set!  I think I might try to make this card again and emboss the snowflakes over the white ink next time. 

I also made a little tag to go with the package that I will be putting this card with.  I am trying to make things as special as I can for Tim this year as it will be a hard day for both of us - our first Christmas without our beloved Papa Stuart.  Just praying to make it through with grace and peace in our hearts.  Thank goodness for all of our wonderful family and friends and all of you out in blog land who have offered such wonderful and loving friendship and support these past months.  It means so much to me when I read your comments and emails!  You are a blessing to me! 


So thanks very much for taking a look at my creations and leaving such sweet comments on my blog.  They truly do brighten my days!

I was able to get my desktop computer that has my picture editing software on it up and running tonight so my picture quality is a bit better but as usual it was a very dark and grey day here in Seattle land which makes good picture taking difficult even with extra lighting.  It looks like a new computer is definitely in our future as even with 2 repair appointments it is hit or miss as far as the desktop booting up when I want to do some photo editing or other work.  Bummer! 

Happy Crafting friends!!!

:) Jill


Sunday, November 4, 2012

A wee Christmas tree...

Hello,
Just a quick post with a card I made for the Waltzing Mouse Sketch Challenge #122. Here is this week's sketch chosen by the wonderful Renee Lynch.


I just love this sketch!  I had been playing with one of my favorite Waltzing Mouse Stamp sets "Sewing Box Christmas"and came up with this card:


I hand stamped the tree and then fussy cut it out.  I just love the way it turned out. I love the home-spun feel of the sewing box stamp sets so much and I used some of  the smaller stamps - the star and heart - to create my background.  And I of course added glitter to my card as I do to almost all of my Holiday cards.
I love the new Waltzing Mouse "Opera Tags" dies and used one to back my tree.  I edged it with some brown sugar ink to bring out some of the detail in the die cut.  I used a small doily diecut to create a "rug" for my tree to sit on.

Thanks for taking a look at my card!  There are so many inspiring cards from the designers over at the Waltzing Mouse Challenge Blog.  I hope you find time to join in this week's challenge!
 Happy Crafting!

: ) Jill

Supplies:


Tuesday, October 30, 2012

Pinecones make me sooooo happy!


Hello Friends,
I took some time today to make some cards for "Make it Monday #89 - Creating windows for floating images" over at Nichole Heady's blog. 

I was wanting to use my new Peaceful Pinecones stamp set.  I ADORE pinecones and have them in several places in my home.  I have a wreath made out of varous species of pinecones in my bathroom and a glass of teeny tiny pinecones on my windowsill in the kitchen so I can look at them while doing dishes.  I also tend to have them in the pockets of some of my coats if I find a cool one when I am out walking around the neighborhood or at a local park.  I am especially enamored of the Deodar pinecones that look like roses when they open and have made many crafts with them throughout the years. One of my favorite Christmas ornaments is made with these pinecones and was given to me by my sweet friend Roberta back in the 1980's.  This beautiful ornament has held a place of honor on my tree for many years. Some of you know that garden roses are my favorite flower and I think of these pinecones as my "winter" roses.  They are gorgeous!!!  Here is a picture of them if you have never seen them before:


Anyway you now know (probably way more than you wanted to) that I love pinecones...and because of that I had to get the Peaceful Pinecones stamp set.  I just love it and love the projects I have made with it so far.  My sister fell in love with them too when I showed her the tag and card I made today.  I just love this stamp set - so thank you Dawn McVey and Nichole Heady and Papertrey Ink!  It is just sooooo beautiful!  I am in pinecone heaven!


I am also loving the "Winter Snow Globe Stamp Set" and used the little Christmas tree for the focal point on this very simple card.  I made a tag out of the die cut leftovers using some snowflakes left over from other projects that were sitting unloved on my craft desk.  The designer paper is from a 12x12 stack of My Mind's Eye Christmas papers from several years ago.

Thanks for taking a look at my cards!  What stamp sets are you loving the most right now?
:) Jill
 

Sunday, October 28, 2012

You are so sweet!


Hello Friends,
Had a little time on Sunday night to make a card.  My son and I had finished carving our pumpkins and we decided to play for a bit - he on the computer and me in my crafty space.  I was inspired by the beautiful cards over at the C84FN Color Challenge and specifically challenge #66:

There are so many lovely creations by the design team (WOW!!!!) and I had an idea come to mind right away.

I wanted to use a new to me flower die from Magnolia and make some negative die cuts and then place the actual flowers into the negative spaces with designer paper behind them.  On the road to doing this I ended up putting foam tape on the wrong side of my negative die cut piece. This was a bummer because this pretty light grey card stock had such a lovely texture on it.  I didn't want to waste the piece though so I used it anyway and then had to turn my flowers to the wrong side too.  Behind the opening in the Magnolia flowers is a piece of gray flowered Prima paper but you cannot see it very well because of the glitter glue I added to the flowers to make them POP more!  Needless to say my card did not turn out exactly as I wanted it to but it is still pretty I think! 


Thanks for taking a look at my card.  I thought I would end my post with a picture of my son and his wonderful Jack-o-lantern.  I love the face design that he came up with!  I just helped with the cutting!  I love the little carving knives they sell now - much safer for kids that want to carve!!!


Happy Halloween week everyone!  Enjoy!
:)  Jill and my sweet boy Tim