Sunday, May 8, 2011

Happy Mother's Day 2011!

Today is Mother's Day 2011 and I want to wish all of the wonderful women who mean something in children's lives a very happy day!  This includes my lovely sisters who are Aunties to my son and are like second Mom's to him - only more fun then me! LOL!  My sisters take time to do special things with my son even though many of them are not Mom's themselves and lead very busy professional lives.  This is such a blessing especially since my husband has cancer and we both have less quality time to spend with him as we attend so many medical appointments each week.  I am also blessed with the most beautiful and giving Mother in the world and a wonderful Mother-in-law who is so kind to me.  The list of important women in my life continues with a group of Mom's that I have met through my son's preschool and kindergarten.  We help each other, support each other, laugh together and even sometimes cry together.  We rejoice when one of us gets to meet Dave Matthew's in person and we giggle over the silly things that brighten our days.  Women are amazing and Mom's most of all.  That is why MOM spells WOW upside down!  So God Bless all the amazing women in my life on this beautiful Mother's Day!  Wow!

On to some cards I have made to commemorate this important day.  Most of these cards were made while I was sitting by my husband's side as he received a drip this week to improve his immune system.  Making cards is something that I can take with me and work on in fits and starts as time permits when I am at some of his appointments.  It makes the time go by and keeps me from worrying so much.  Plus I can work on the many thank you notes that are needed for all the friends and family members that are helping us out right now.

Here are some pics of this weeks cards:
Card 1:
This card is probably my favorite.  I made the flowers by tearing a piece of paper into a circle and then rolling it up to make the "rose" shape.  Then I loosen the rolled flower until it takes on the shape that I like and use glue dots to hold it in place.  I also tore the paper stems and leaves and grass.  The butterflies are from two different Martha Stewart punches and are made of vellum with some light pink pearl accents for their bodies.  I haven't decided on a sentiment for this card yet because I am not sure if I will use it for Mother's Day or some birthday's that are coming up.

This picture is a little bit closer.

And closer still.

Card 2:
This card was made for my niece who is celebrating her 19th birthday! 

The dress form stamp is from Gina K Designs and is stamped on Crate Paper. Dies are from Spellbinders and Papertrey Ink.

Card 3:
This card I made for my Mother-in-law.  I am hoping that it reaches her on time to celebrate the day!

The stamp is from The Girl's Paperie and I love it.  The doily is a die from My Favorite Stamps and the other die that the sentiment is on is from Papertrey Ink.

Card 4:

This is another Mother's Day card!  I am just in love with the baby roses made from paper.  I made one by hand and I used my MFT rolled rose die for the other 2.  I like both methods of making these flowers and especially like that you can make them anytime with our without the die in your hot little hands!  The torn ones on my first card are the best of all in my book - lots of texture from the torn edges.

Here's a close up of the design...

A little bow using some twinery twine finishes the bouquet of flowers along with some handcut leaves.

Card 5:

This card is similar to the last one except it has a vertical profile instead of horizontal. 
The background paper is from Papertrey Ink - Happy Spots.  And the dies are from both MFT and PTI.


Well that is it for card-making for this week.  I didn't enter any challenges but I was away from home when I made most of these and just went the way my mood took me.  I got an offer again to make cards ongoing for a business but right now I am focusing on getting my husband well so I turned it down for now.  Maybe someday....wouldn't that be a dream come true to get paid for doing something that is a labor of love!
Have a great Mother's Day everyone!  God Bless!
Jill

Wednesday, April 20, 2011

Easter Tags from Made by Janet Etsy shop....

For Easter tags this year I purchased some lovely art from Made by Janet on Etsy.com.  Here store is here:  madebyjanet .  Here is one of the tags that I made using her artwork.  I kept them simple and after cutting them out I just added some stickles glitter glue and ribbons.  I gave a set to my Mother to use for Easter and am making more for myself.  Hopefully I can add more pictures later on....


A few cards that I haven't posted...

It has been a hectic week and I haven't posted for a while.  Here are some cards that I made recently and did not get a chance to put onto this little blog of mine...


This card uses the "Love Lives Here" stamps and dies from Papertrey Ink as well as the Happy Spots paper. 


The 3 birds represent our family and are on the inside of the card to brighten it up a little bit.


Here is a close up of the "bird" card.  This is a set of stamps from Skipping Stones Design that I just fell in love with.  For some reason I cannot get the pictures of this card to load horizontally.  I am going to give up for tonight and just load this one only.


Here is a picture of the last card.  I used my Papertrey Ink butterfly dies to make this card.  As well as a PTI background set.  However once again when I upload the picture it is getting turned from horizontal to vertical and I don't know why....ahhh the many things that I don't know how to fix in blogger land.  Anyway I will see if I can find out how to fix this and come back and edit it. 


Wednesday, April 6, 2011

Papertrey Ink's Make it Monday #9 - Heat Embossing

Well it is Wednesday and I am finally getting some time in my craft room to create a card for the Make it Monday challenge over at Papertrey Ink. 
 

The challenge this week is to do some embossing.  So I first embossed a border along the bottom of my card panel with Background Basics: Petal Power.


Next I cut a matstack four label and also embossed it.  Then I stamped and embossed the white circle tag with one of the individual flower stamps from the background basics petal power set to make a background for my sentiment which is stamped in Archival ink - jet black.

   I tied a ribbon around the mat stack label before adhering it to my card panel and then adhered the card panel to my card (my favorite color Aqua Mist Cardstock from PTI for both the panel and the card)   To give the panel some additional dimension I inked the edges with some PTI Fresh Snow Palette ink.  I thought the card needed a little something more on the bottom so I added some mini-pearls along the stamped border.  Just a few...not too many...it ended up being 4 which is an even number - is that a bad thing.....???  Anyway I like the way the embossing sort of looks like light pink velvet.  I used red magic versamagic chalk ink with white embossing powder to get this affect.  I think it looks kind of cool on the aqua mist cardstock.  That is it for me today....off to make dinner for my men.  We are having meatloaf, potatoes au-gratin and fresh asparagus!  Mmm Good!  Happy Card Making everyone!  Can't wait to see what everyone does with this challenge on the PTI link blog. 
: )  Each Day is such a gift! 
Jill

Tuesday, April 5, 2011

Weekend Card Making....

I made a few more cards over the weekend that I thought I would post quickly this morning.  Here are some pics:
This is a thank you card for my parents for all they do to assist my family each week.  The butterfly is from a stamp set by Skipping Stones Design called Healing Wings.  I stamped it in brown ink on white cardstock and then colored it with a copic marker and added glue / glitter. 


I then used some maya road trim to make the "body" of the butterfly and some cake decorating flower stamens for the antennae.

  The tag and sentiment are from Papertrey Ink's "Tiny Tags" set.   I used a label spellbinders die on some basic grey coordinations embossed cardstock and sanded it to make the background for this card. 

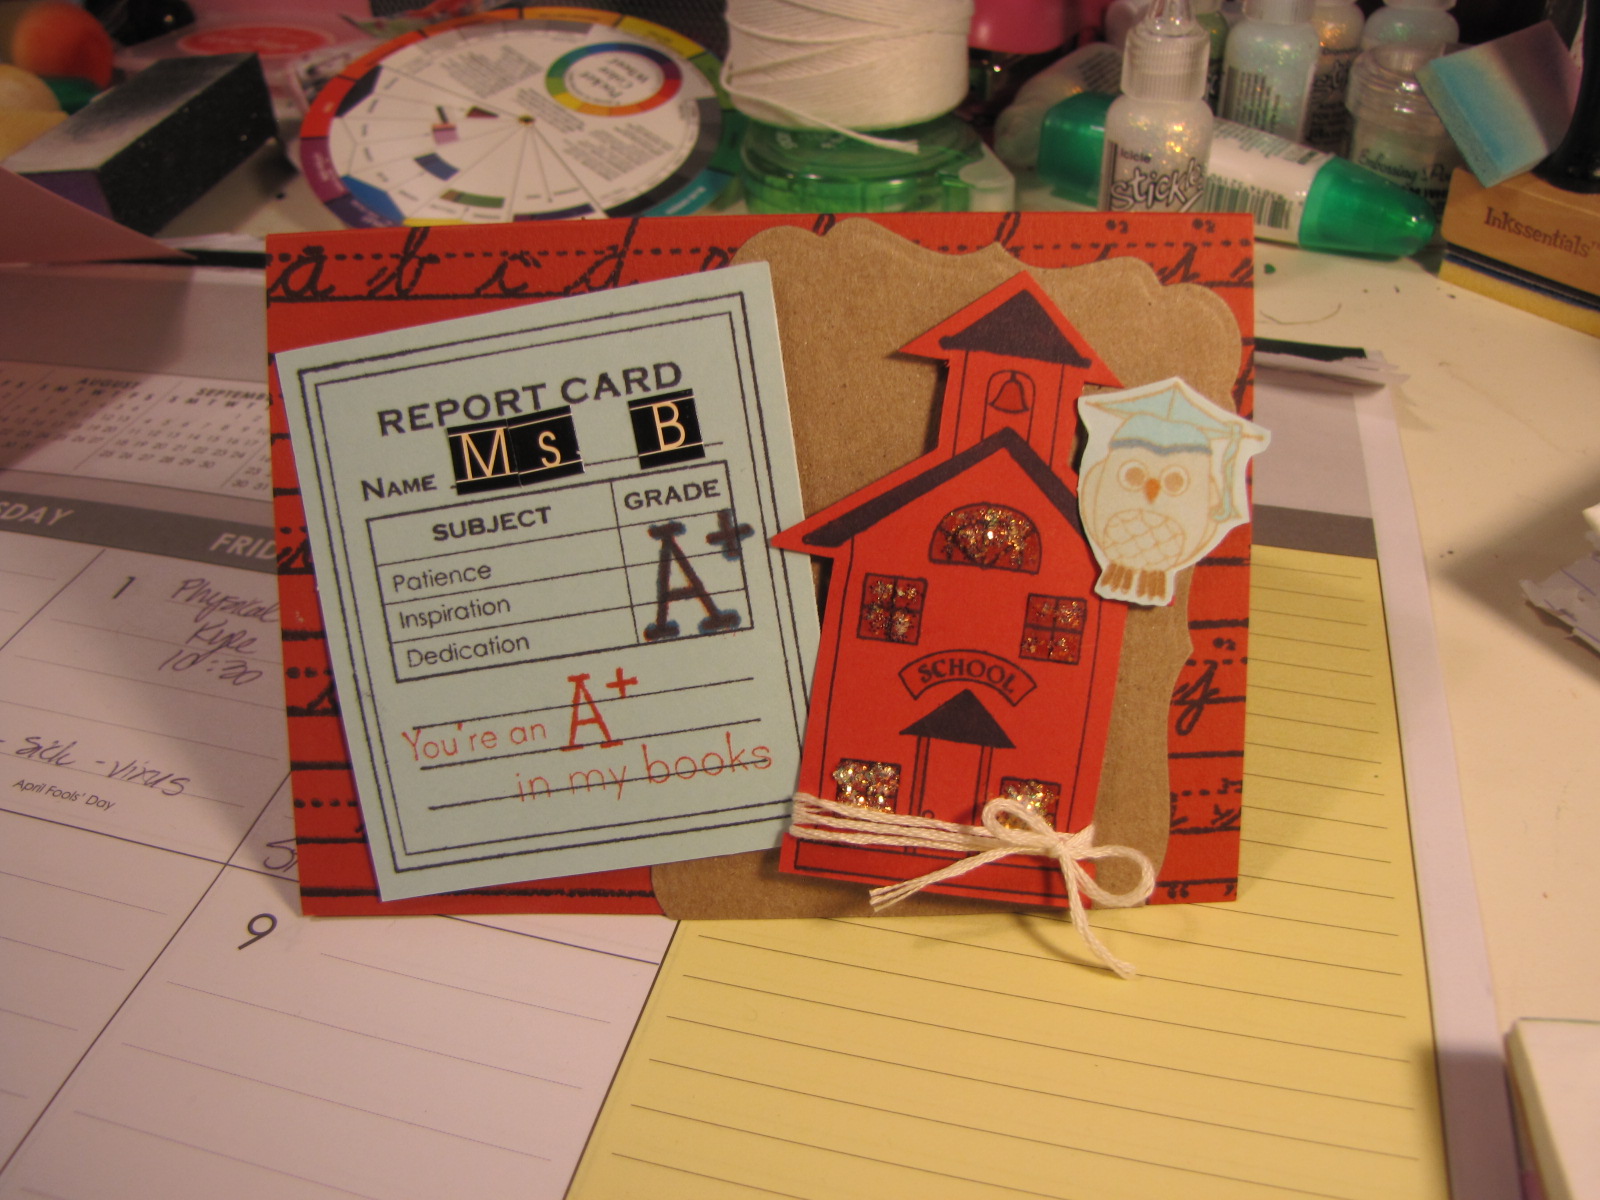
This next card is for my son's teacher.  There are only 11 weeks left until Summer vacation!  I thought I would get a jump on a card for his teacher since I had some card-making time.  This is a set of stamps from Taylored Expressions and I just love the little school house! And the owl too!  So adorable!

His teacher gets an A+ in our books!  She is fantastic!  The alphabet background is stamped with a Glitz distressing set 3 stamp.  And I added some glitter to the windows to make it look like the lights were shining in the little school house.  My son wanted to give it to her on Friday before spring break instead of waiting until summer....we will see!  She deserves a card everyday!!!! 

Well that is it for today.  Happy Tuesday to you all!
: )  Jill

Friday, April 1, 2011

Additional entries into PTI Challenge #8

Friday night turned out to have some crafting time in it this week.  My hubbie went to his friends house for some gaming and my son was playing some computer games so I broke out some PTI stamps to play with and came up with a couple of simple cards.  I used three Papertrey Stamp sets:  Tiny Tags; Love Lives Here and Year of Flowers - Roses. 
Here are the cards I made:
I added some copic coloring to the rose on this yellow card but I really need to take a class to learn proper techniques.   After I was done I was getting ready to do this entry and looked up some of the design team cards for this set (Year of Flowers - Roses) and Nichole and others do such an incredible job with their copics that I think I will be watching some how to videos this weekend.  It is fun coloring.  I really like it but I also want to do a better job at creating depth with the markers. 


My second card is even more simple and just has the rose stamped in the corner with a tiny "thank you" tag tied on with some baby heart tassels.  I did go over the outlines of the stamped rose with a marker in a tonal color to make it stand out more but that is it.  The backgrounds of the spellbinders label die cuts on both cards were blended with both distress and versamagic inks and an ink blending tool.  They started as white cardstock and I had fun mixing ink colors to create the backgrounds.  I needed another color of yellow or an entirely different color on the first card.  I wish now that I had used some distress old paper ink around the edges of the die cut for added dimesion.  I already glued everything down so I won't fix it this time....there is always next time and I am learning with each card I make.  By the by these two cards are going to be mailed so I made them fairly "thin" and non-dimensional so that mailing won't be a problem...

Here are a couple of close up shots of the tiny tags - made with PTI sets "Love Lives Here"  and  "Tiny Tags":

I had fun making the little heart tassels to add dimension to this card.

Happy Weekend everyone!  Make each moment count! 
Jill

Thursday, March 31, 2011

PTI Challenge #8 - Ink Blending Techniques

It is time for another Make It Monday Challenge over at Papertrey Ink.  This weeks challenge (#8) is all about ink blending techniques.  This is something that I have been experimenting with more and more as my card making skills increase.  However I was still positively awed by Betsy Veldman's card in the video on Nichole's blog for this week.  Take a look here to see the video.   I started to do something similar but got a little off-track and will finish that card later. 

On to the birthday card that I did finish.... 
I needed another birthday card for a friend so I decided to try some ink blending techniques on various elements.  The card base is fairly basic with two patterned papers and a piece of lace. 


Next I made a large flower with my Tim Holtz tattered floral sissix die and began distressing the blooms by crushing them in my hand.  Then I started using some distress inks to color the edges of the flower layers as well as blend into the entire surface of each section of the flower.  Next I stamped with a "cherish" phrase stamp on the surface of the flowers before putting the flower together and adding some twine in two colors and a button.  I topped it off with some stickles.

After making the flower I also inked a heart diecut with two colors of chalk inks taking it from white to the lovely turquoise shade it is now.  I also created a patterned paper diecut and added an additional layer of paper to it and distress inked it also.  Lastly I added Riptide glimmer mist to 3 sets of leaves cut from some mint colored cardstock.  The glimmer mist added sparkle and shine to the leaves and turned them such a pretty color.   


Still feeling like I don't have my crafting mojo.  Lots happening at home right now and I am tending to only make cards I need which is harder than just making something for fun.  Plus I have the most horrendous cold this week!  Ugh!  Anyway thanks for looking! 
Enjoy each moment!  : ) Jill

Sunday, March 20, 2011

A little scrap of this and a little scrap of that birthday card for my sister....

I decided to spend a little time this Sunday afternoon making another card for the PTI challenge #6 because I needed a birthday card for my sweet sister.  It surely isn't the best card I have ever made but a homemade card is always more special than store bought don't you think?

I wanted to try out my new "Just the Ticket" stamp set and the coordinating die and impression plate.  I sure do love this set but boy did I struggle with my card today.  Do you ever start a card and not know how to finish it or just have so many little things go wrong that you want to take a break?  Today I had that problem.  I just couldn't seem to make the card come out right.  I wish I had taken pictures of all my different ideas as maybe someone could give me some cardmaking feedback.  I think I am just having an off day today and the fact that I am lacking sleep is probably contributing to my lack of crafting mojo.

Anyway here are some pics of my little birthday card attempt...
I used my scoring board to make lines on the left side of the card base and the impression plate to impress the right side of the card base.


After trying lots of different tags for the sentiment I finally made one because nothing was looking right.  I made a birthday cake out of some leftover glitter paper that had been trimmed with a Martha Stewart edge punch and was sitting in my "scraps" basket on my desk.  I think it kind of looks like a cake with candles on it but my "faux" stitching is crooked and the sentiment is a little bit low and I couldn't find anything that I liked to fill in the space above it....maybe I will look for a baby stamp again later...maybe I can find one that says "Sister" in my stash.

Anyway that is it for me today.  It is 6ish and I am watching Toy Story with my son and then we are going to have bath time and an early night.  One thing I will say is that no matter how something turns out I always enjoy my time in my little crafting space in my basement - especially after having a nice walk and play time at the park earlier in the day.  It is just fun to get cozy at home on a Sunday afternoon and get my fingers all inky!  Happy Birthday to my sister Diana tomorrow!  I love you my sweet! 
Blogging off....until next time...smiles - Jill

Friday, March 18, 2011

Make It Monday Challenge #6 - Impression Plate Tricks #1

It is time for another Make it Monday Challenge from Papertrey Ink.  Challenge #6 is titled "Impression Plate Tricks #1".   You can see the posts regarding all of the PTI challenges on Nichole Heady's blog at  http://nicholeheady.typepad.com/capture_the_moment/ .  See the post for Monday March 14th for the current challenge video and post. 


I chose to use an embossing folder to go with the flower I had planned for this card as I only have 1 texture plate from PTI called "Admit One" and it did not go with the theme of the card I wanted to work on.  (NOTE:  If I have more crafting time this weekend I may make a birthday card using this impression plate and upload a second card.  I love these challenges!)

The flower is made using the Tim Holtz tattered florals sissix die with lots of stamping, inking, glitter, and a brad in the center to hold it all together.  I found some velvet leaves at my local thrift store a few weeks ago and added these to the side of the flower and used stamps from the Mat Stack 4 collection with the new banner die from PTI.  This card is another thank you note that I am sending to one of Stuart's cousins who has been helping us very generously during Stuart's illness. We are so blessed by our family and friends. 

Here are a few more pics of this card:  


Thanks so much for looking!  I am having fun learning to make cards and the PTI challenges really help expand my techniques!  Plus they are so fun!  Have a great day!  Each day is truly a gift so celebrate it!

Smiles,

  Jill

Tuesday, March 15, 2011

Card Making night with my son...

Hello it is Tuesday night and my son and I were making cards together and he wanted me to post his and mine to our Greenwood Girl Cards blog. 

We used a "Pure Innocence" stamp set called Warm Fuzzies from My Favorite Things to make our cards.
My sons card has two bunny kids on it and he helped color them and I cut them out.  He made the sun with orange rays and the clouds and grass.  He picked out (and I helped him stamp) the sentiment which is from Michael's and says "All U need is Love".    We have the occasional craft night when Papa is off with the guys and it was fun making cards together.   Here are a few pics:

This is a picture of the two cards side by side.  My son's is on the right and he added the orange sunrays at the last minute.  He wanted the card to be very sunny!  Which is a good thing since it hailed, rained, showered, and poured today with thunder and lightning!  Quite something for Seattle!

Here is a close up of his card.  It was his idea to place the sentiment on the cloud and to make it two layers - the first layer is felt and the second is white cardboard tile from PTI with the sentiment.  You can't see the felt on the large cloud because it is behind the sentiment completely.


Here is a close-up of my card.  Some of the dies used are from My Favorite Stamps and some are from Papertrey Ink.  

I have one more card to share today.  This is one I made as a thank you for my neighbor and her sister who have been helping my family since my husband's diagnosis with cancer back in July of 2010.  Here are some pics:

The stamp is from Hampton Art and the flower was made using the Tim Holtz floral die and both patterned paper and tissue paper.  I made the leaves with a Martha Stewart punch and used too much stickles glitter glue to bling the card up.  The butterfly is made from the "Love Lives Here" dies from PTI.

Thanks for looking at my little card blog.  I decided to make a blog for my cards in 2010 so I could see how my skills progress over time since this is a fairly new hobby for me.   Until I blog again - be happy!  Each day is a gift!
 

Wednesday, March 9, 2011

Papertrey Ink's Make It Monday Challenge #5 - Distressing Edges

Whoo!  I finally got a chance to sit down and make a card for one of PTI's Make it Monday Challenges.  This one is challenge #5 - distressing edges.  I have been lacking my crafting mojo the last few days because of a nasty migraine but I wanted to get a thank you card made so I pulled out some of my new stamps and dies.  I used the new Flower Fusion stamp set ( Here ) and the coordinating die to make the flowers on this card.  This is such a fun little $5.00 stamp set and so versatile! I also used the new Buttoned up #2 dies to make the flower centers.  An embossing folder created the background of diamonds and I used the new doily edge to create the "grass" at the bottom of the card.  I used a pair of scissors to do my distressing on the edges of the card and the background paper with the embossing.  After stamping the 3 flowers on my white cardstock I cut them out using the mat stack die.  I then cut several flowers with the die and popped them up on top of the stamped flowers for dimension. 

I colored the top part of the mat stack 4 diecut with my Frost Blue (B00) copic marker and blender pen to create a little bit of "blue sky" but it is hard to see in the pictures. The sentiment "a note of thanks" is from the mat stack #4 set.

Here are a few pics:


I hope you enjoyed looking at my card today.  I am really going to try and join the challenges more frequently in the coming weeks.  They are a lot of fun!   Thanks for looking!  : )  Jill

Card Supplies:
Stamps:   Flower Fusion #1 by Melissa Bickford and Mat Stack 4 Collection  - PTI
Ink: PTI Fresh Snow (edges of pink embossed paper)  Versamagic - Spring Pansy; Studio G - pink pigment ink; Archival Ink - jet black.
Paper:   Cardstock:  pre-made card: Paper Zone; Patterned papers:  My Minds Eye and Jillibean Soup.  Cardstock for doily edge diecut:  Quikcutz strips. 
Other:   Dies:  PTI; Twine:  The Twinery; Glue Dots, Ad tech adhesive, Foam "Pop-UP" Tape - dollar store. Scissors for card/paper edge distressing.  Button - craft supply
Finished Size:   Approx 4.75" x 3.5"