Thursday, April 25, 2013

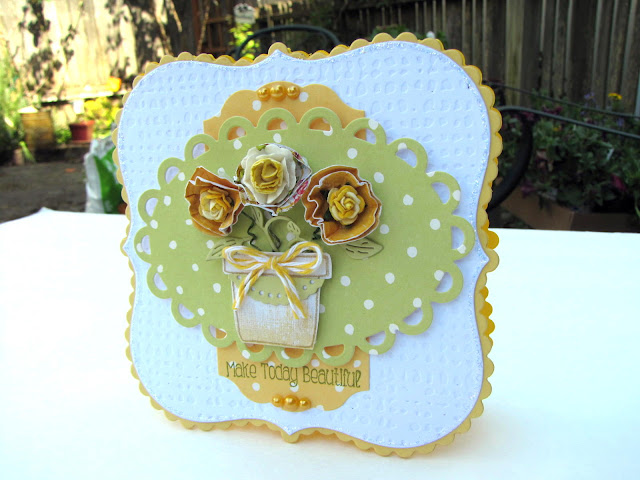
Make Today Beautiful - a card for the Spring Bliss challenge at The Shabby Tea Room....


Hello All,
Last night I whipped up this sweet little ray of sunshine card for this week's Shabby Tea Room "Spring Bliss" challenge.   Here is this week's graphic:

Debbie has asked that we create a card or project inspired by the INSPIRATION PHOTO USING YELLOW, GREEN, WHITE (OR CREAM) AND INCLUDE FLOWERS AND POLKA DOTS!


I had just received the "Make Today Beautiful" stamp set in the mail from Paper Sweeties and decided that this was the perfect challenge to initiate it - ie: get it all inky!!!!

 
 I stamped the rose flower several times on patterned papers and hand cut them and then distressed them with some water and crinkling.  I then threaded some small paper roses through the centers of 2 of the blossoms to create my flowers for the pot.  I twirled the stems around my stylus to add dimension to them.  I stamped the flower pot on designer paper too and then glued everything down and added a few baby die cut leaves.  A portion of a border die cut adds decoration to the pot along with a small twine bow. 


Some polka dot die cut mats using paper from Amuse Art Stamps help to ground the pretty pot of flowers and a few yellow pearls finish it off.  The white mat is embossed with a burlap impression plate from Cheery Lynn Designs -my polka dot embossing folder is too small for square cards - boo hoo!!!   

Thanks for taking a look at my card!  I sure love my sweet little pot of flowers....and speaking of flowers I am off to my garden to plant some that I picked up this morning at the nursery near my home.  It is a sunny day in Seattle and that means I am outside as long as I can be soaking up some much needed vitamin D!
As Debbie's sweet stamp set says - "Make Today Beautiful!"!
Hugs,
Jill

Supplies:
Cardstock: Papertrey Ink and Michael's
Stamps:  Make Today Beautiful set - Paper Sweeties
Dies: Cheery Lynn Designs, Papertrey Ink
Other: pearls, flowers, twine, stickles, glue, score tape

Entered into the following challenges:

Challenge: The Shabby Tea Room #163 - Spring Bliss - linked above
Challenge:  Paper Sweeties  Sketch Inspiration #6  
(Note: Edited this post on 4-26-13 to add entry to the Paper Sweeties Sketch Inspiration Challenge #6.)
Wednesday, April 24, 2013

Waltzing Mouse Flower Show - card #2 for Meredith MacRitchie


Hi everyone,
I just had to CASE (copy and steal everything) another card today for the Waltzing Mouse Flower Show.
I specifically wanted to work with the cards posted by Meredith MacRitchie on her blog "A Delightful Waste of Time".  I loved the stamping, coloring, and embossing techniques that she did on her cards using the Camellia set.  I knew I would need a block of time to make the card and today I decided to try it after speeding around and getting a bunch of other things out of the way to free up some time after lunch.

Here are the two cards Meredith made - they are both so GORGEOUS!!!


 I was especially intrigued by the water color stamping with the embossing - the card on the left.  But I definitely drew inspiration from them both for my card.

I wanted to try adding water to my images prior to stamping them but did not have a spray bottle so I tried something I will call "finger-paint" stamping.  Here are some pictures:
 First I mounted 3 different camellia stamps on blocks.  Then I would ink them all up with both Raspberry Fizz and Berry Sorbet ink with the rock and roll technique. 
After stamping the three flowers I dipped my finger in a small cup of water and rubbed the water over the flower in a circular motion making sure to go outside of the bloom slightly to spread the color.  When this was done I dried my paper with a heat tool and then proceeded to the embossing stage until my sheet of background paper was complete.  Then I got to place the finishing touches on my card.  Here is what my desk looked like by the time I was done (just for grins!)

Isn't this great!!!  I had so much fun making this card but alas it is time to go and pick up my son now....I will be back to finish this post a little later so I can add the product supply list!

Thanks for taking a look at my card!  And thanks to Meredith and all of the designers for fantastic inspiration!  I hope I get to make a couple more cards before the deadline!
:) Jill


Tuesday, April 23, 2013

Waltzingmouse Flower Show CASE Competition....a card CASE'd from Helen Berry Design

Hello Everyone,
I seem to have found some MOJO to create this week.  Yeah!!! I have been sadly lacking in the ability to create ANYTHING for over a week now and then the last two days I am whipping out cards in no time at all....go figure.  I think the events in Boston and Texas and in my own life do get me down sometimes and it is hard for me to create....but I also know that it is our incredible human spirits and our families and friends that keep us keeping on!  My heart goes out to anyone that is in pain from difficult circumstances in their lives!  Blessings to you ALL!

Tonight I put together a card for the Waltzingmouse Flower Show CASE competition:

I hope you will got to the Waltzingmouse site and join in all the fun!  Thanks Claire and designers for wonderful inspiration and a fun competition to participate in!  I want to just case every single incredible card that the designers came up with....but for today I chose to case this card by Helen Berry: HERE.  Here is a photo:


  I specifically wanted to play with Folk Art Labels No. 25.  A small $6.10 stamp set that is full of charm!  Here is what it looks like (courtesy of the Waltzingmouse Stamps Site: HERE.)


  I was intrigued by the small stamp on the right that is almost pine cone shaped.  I just fell in love with that little stamp and wanted to play around with making a background with it.  Here is what I came up with:

 I liked the way Helen stamped her background.  She made her card multi-colored and broke her background up into thirds visually. However, after a few minutes playing on scrap paper I gave up on this idea and ended up just adding some darker pink centers to the lower third of the card and the additional mats to balance the card.  I wanted to only use stamps from this one set to make my card so my choices were a little more limited.  I think I may try to CASE this card again though because the tri-color background was what I originally set out to CASE as I was so intrigued by the way my eye moved through the card.  The Rule of Thirds is so powerful!!! I would do well to remember that more often! LOL!

Anyway thanks for taking a look at my card.  And thanks to Helen (and all of the designers) again for the inspiration and to Claire and the Waltzingmouse family for their wonderful products that I so enjoy playing with!
:) Jill


Make it Monday - card #4.....

Hello....just one more card for  Make it Monday #113 - Perfect Pearls over at Nichole's blog: Capture the Moment.

This one is for my parents who always host a wonderful party at their home on the 4th of July.  I was going through my stamps and when I saw this one in the Friendship Jar Summer Fillers set I wanted to try it out with perfect pearls....

Thanks for taking a look!
:) Jill

Round 3 for Make it Monday and a card for the Retro Holiday Challenge at Festive Friday


Hi all,
Still playing with some perfect pearls this morning for the Make It Monday #113 - Perfect Pearls challenge over at Nichole Heady's blog Capture the Moment.  After a very long day yesterday including baseball practice with my son last night until 7pm....I decided I deserved a little craft room time this morning.  I checked in at the Festive Friday challenge and this time it is all about Retro Christmas Cards....


"Retro" to me can mean traditional or even some vintage or "retro" graphics.  I remember the cards we received at Christmas when I was a young girl having felt or velvet on the images.  I also remember receiving cards with vellum overlays and cute images.  For today's card I incorporated perfect pearls into a traditional Christmas card with some felt and some vellum....


Supplies:
All items are from Papertrey Ink except for the adhesives and perfect pearls used as well as the Memento Tuxedo Black Ink.  
Stamps:  Layered Postmarks Holiday 

Thanks for taking a look at my card!
Happy Tuesday!
:) Jill


Monday, April 22, 2013

A little Perfect Pearls Christmas Card...

Edited to add:  New photo taken in the daylight instead of at night.....


Hello,
First thank you to everyone who gave me info about pearl powders in the comments on my last card.  The information as well as the referral to splitcoast was very helpful - and I would not have thought of it!!!

On to Round 2 for Make it Monday's Perfect Pearls....a little red and green Christmas Tree....

(So very happy that I found 4 colors of perfect pearls after a little bit more digging....I knew I had some somewhere...)

When I saw Nichole's video I was very interested in the Mehndi Medallion card where she took the perfect pearls off by stamping over it.  I immediately thought of the Layered Postmarks Holiday Christmas set for this technique.  I wanted to make a tree and see if I could show both red and green on it.  I started with a red "perfect pearls" tree and stamped off to reveal the green pinefeather cardstock underneath.  A few felt and bling accents finish off this fairly simple card.


Next I hope to do the opposite with red cardstock and green perfect pearls. Stay tuned....but it will have to wait until tomorrow as it is time for me to get my little one to bed. He just finished his reading. He had baseball tonight and we are running late with bedtime as we didn't get home until after 7pm.

Goodnight everyone!
:) Jill

Going to the Chapel and gonna get married.....

Here with a card for Make it Monday #113 - Perfect Pearls over at Nichole Heady's blog "Capture the Moment" for Papertrey Ink. Nichole made an incredible video for this technique and her cards are just stunning!  I couldn't wait to dive in and try it myself!

I really liked the ease and beauty of this technique!!!  I used what I had on hand which was Pearlex powders in skyblue and micropearl.  The only problem I had was that the Pearlex powders did rub off if you handle the card too much.  I opted to die cut my panel as I was working on finishing the card design and I did lose some of the pearlex powder from my design....see below on the left side margin of the outer frame and around some of the polka dots:

I went in with a versamark pen and touched it up slightly and added more pearlex powder but you can still see the smudgy area.  Overall I love how this card turned out and it is so pretty in person....I just need to re-do it and possibly set the powder with a light spritz of water or something else.  Any suggestions?  I will also invest in some perfect pearls to see if it makes a difference as I don't know very much about pearlex powders and if they are meant to be used in this way.

By the way the card is for a friend who is getting married this summer.  I have the design now....I just need to make it one more time after I figure out how to set the powders!   This is such a fun technique! I hope to make a few more cards!  Thanks so much for taking a look!  There are already so many beautiful cards in the gallery!
:) Jill

Supplies:
Stamps: Love and Marriage, Fabulous Frames - PTI
Cardstock:  Enchanted Evening, Pure Poppy and 80# silver pearl - an entire ream I scored at the thrift store!
Dies:  Creative Time for Me - 3x4 Journal Frame; Lil Inker Designs - Stitched Mats: Rectangle
Other:  Polka Dot embossing folder; Heart bling - Amuse; Pearlex Powders - sky blue and micropearl; adhesive, and dimensional tape.


Sunday, April 21, 2013

Celebrate Today....

Hello Friends,
I am in a card making slump...of sorts.  I have several cards started on my desk but nothing seems to be coming together easily the last couple times I tried to steal a few minutes for card making.  However I have been enjoying Spring Break with my little one and celebrating that all week so it has been a good week all in all!  So nice to have some time away from the daily grind to spend quality time with those that we love most.

Today on this lovely Sunday afternoon I have cobbled together a card full of some lovely purple roses.
I drew inspiration from the "Pretty in Purple" challenge over at Cheery Lynn Designs and the "Stamp a Background" challenge over at Serendipity Stamps Challenge Blog.   There are wonderful prizes to be had for each session and I just love the chance to win some new goodies to play with!  Don't you?!  I hope you will join in too!

Here is the card I came up with.....

 I wanted to try something different so I made a tall card instead of the standard A2.  I used a lovely new rose stamp that I won from Serendipity Stamps for a challenge entry a few weeks back.  I was able to order several new stamps with my $20.00 gift certificate and I cannot wait to play with them all.  I used the rose stamp to make a background on the wisteria cardstock mat and then used it again to create the focal point.  I colored the image with a variety of Copic markers. 

I used a new die from Cheery Lynn Designs to create the purple trellis that the rose stamped mat is sitting on.  It is called the Gauze Border (item B305).  The scalloped oval mat is also from Cheery Lynn - item XM-8.  And I made the felt roses using the miniature rose die - B152.  I slid an "I am Roses" purple and white mini rose through the holes in 2 of the rose die cuts to create the flowers for my mini rose bouquet at the bottom of the card and as a topper for my bow. 

Thanks for taking a look...
:) Jill


Thursday, April 11, 2013

Welcome Baby!!!

Edited to add:  So excited that this card was chosen as the winner of the "Oh Baby" challenge at the Serendipity Stamps Challenge blog - SSCB#9.    Thanks Serendipity team and to everyone who entered with their beautiful baby creations!


Hello Everyone,

I needed another baby card this week and decided to play along with a couple of challenges.  This week Cheery Lynn Designs has an "Anything Goes" challenge.  You can find the info:  HERE.  Since anything goes I decided to play with my favorite French Scalloped Flair stackers  and French Flair Stackers from Cheery Lynn for my baby card.

Serendipity Stamps is also hosting an "Oh baby" challenge:  HERE.  So I also reached for Serendipity Stamps "Lamb with Heart".  I love using this stamp to welcome new babies to the world!

Here is my card:

After stamping and coloring my image with Copic markers, I decided to make a border around my white mat using some pink tissue paper cut into strips.  I gathered the tissue as I glued it to the back of the panel to create this sweet ruffled edge.  I love using the tissue paper that my stamps are often delivered in to create this type of ruffle - a great way to recycle! 

Thanks for taking a look at my card!  
: )   Jill

 Supplies:
Stamps: Serendipity Stamps - Lamb with Heart; Papertrey Ink - Think Big Favorites #16 - sentiment
Cardstock:  Michael's and Papertrey Ink
Design Paper:  Authentique
Dies:  Cheery Lynn Designs - French Scalloped and French Flair Stackers
Other:  glue dots, Tombow glue, ribbon, tissue paper, stickles - diamond,

A little Moxie and a little Mood Board....and a card...

I have been feeling no mojo (or as someone's blog said today "NOJO") to create anything since Easter...but last night as I was downstairs waiting for a load of laundry to finish so I could throw it in the dryer I became inspired by two different inspiration photos:

The first was this week's Tuesday Trigger over at Moxie Fab World:


I love this photo and I ADORE Magnolia trees!  Or as some people call them "Tulip Trees".  I love the pinks, light yellows, hints of green and brown.  And of course the fact that they herald SPRING! Yay Spring!!!  I am so ready for some warmer weather!

I also love Dawn's Monday Mood Board #8 over at her blog Stamp Away With Me for WPlus9:

I was inspired by the colors in both photos, the soft pink and green stripes in the mood board picture along with the idea of adding a "pop" of orange.

Here is my card:


I stamped the background stripes using WPlus9's Country Charm set.  The tag is from a Sissix die and is cut out of some Amuse Studio design paper.  The stamp set with the flowers and butterfly is also a WPlus9 set though I am unsure of the name?  I doodled the grass with my copics and added the brown pen accents to the flower and butterfly to tie in with the brown stamped sentiment.  The butterfly is my "POP" of orange!  I added some stardust pen to the flower tops and to the butterfly body but you cannot see it in this picture.  It is raining here in Seattle today and though I went outside to photograph I had to stay under my back porch where there are still too many dark shadows.  

Thanks for taking a look! 

:) Jill