Monday, September 30, 2013

2013 Christmas Tags - Tag #1: A Holly Jolly Candy Cane

One of my favorite things to do when I have just a few minutes to craft is to make Christmas tags.  My goal this year is to make a set of tags for each of my siblings and parents to be delivered on Thanksgiving for them to use as they prepare for Christmas.  It is just a little gift that I can share with them from my heart.  This year I thought I would share some of the tags that I make on my blog.

Here is one of the 6 tags I managed to make last night while watching a movie:


This one is covered in glitter because I had a little glue accident while adhering the two parts of the candy cane together!  It is much prettier in person and I know a little girl in my family who will LOVE IT!!!!

Thanks for taking a look!  It is 9pm here in Seattle and I am off to put my boy to bed.
Goodnight!
:) Jill

Trick or Treat.....feeling Mummy anyone?


Hello all,
Here with a card for this month's CC Designs Rubber Stamps Monthly challenge #4.  
CC Designs stamps is one of my favorite companies and they have a new challenge blog that I am excited to participate it!

The theme for this challenge is "Halloween" so I decided to make a card to give my son on the morning of Halloween.  We have a tradition of making special pumpkin-shaped pancakes on Halloween morning each year and I always try to put a special card at Tim's place setting to make it look festive. And of course there just might be a special treat for him to open too!


I built a little scene for him this year using the "Mummy Trevor" stamp from CC Designs and a sentiment from their set called "Halloween Sentiments".  The sentiment is stamped on the tag from the Grunge Envelope Die set.  I made it into a little sign standing up in the pumpkin patch that my Mummy is standing in.  The bright orange moon is stamped with the new Spooky Tree Backgrounder from Waltzing Mouse Stamps. I embossed it with bronze embossing powder and I love the way it looks like the moon is glowing on the branches and making them shine!  A few bats flying through the air help to fill in the rest of this lovely pumpkin patch scene.

Thanks for taking a look at my card.  I love making cards for children at Halloween!  They take such joy from dressing up and playing make-believe for a little while and I love all of the fun stamps that are available for this time of the year! 

Happy Halloween a little early!
Hugs!
:) Jill   
   

Sunday, September 29, 2013

Bewitched and Bedazzled! TSTR Week #186

Hello Friends,
I am here with my final September Guest Design Post for The Shabby Tea Room!  And I have to say that this month has flown right by!

This week's theme is called "Oh My Pumpkin".  Here is the inspiration photo:

The Shabby Tea Room - Week #186 "Oh My Pumpkin" - Create a card or project using burlap and twine

 I love the burlap pumpkins in the photo with the twine curly stems!  They are so adorable and festive!  Perfect for Halloween or Thanksgiving!  So my first idea was to create a pumpkin card:
 I had this lovely piece of gingham fabric that I thought would be perfect for crafting a pumpkin card.  I adhered the fabric to some copy weight paper and die cut it with my pumpkin die and then inked all of the edges and added this sweet pumpkin face with sparkly eyes and teeth!  I then decorated with some die-cut burlap leaves, a piece of doily and a heart-shaped wood button with a lovely twine bow!  And what is a Halloween card without a little sweet treat to go with it?  I pulled out some bags I had on hand and stamped them with the same label stamp from the "Beautiful" Stamp set from Paper Sweeties.  The sentiments are from the Paper Sweeties set called "Occasions".  See links at end of post.

After creating this I really wanted to use my new "Best Witches" stamp set from Paper Sweeties too so I created this card:
 I was playing around with the broom stamp and decided to shape her arms to look like she was holding the broom...here is a close-up....
 The broom is made from bookpaper and I cut the lines of the broom bristles  so that it really looks like a broom though my photo does not show it well.  I also decided to add a trick or treat button that I had on hand.  She is ready to go and get some candy now!
Here is a picture of the treat bags.  I love how easy it is to stamp on these muslin bags!  I stamped in brown, did the sentiment in canyon clay and then colored the border with a copic marker very lightly so it would not bleed.  On the treat bag in the first photo of this post I added some stickles to the stamped border.  Both versions are so cute!  I will be doing this for gifts more often!  It is quick and easy!  All I have to do now is make some tiny name tags and these will be ready to give to the neighbor kids on Halloween!  I think I will fill them up with chocolate kisses or baby candy bars.

Thanks for joining me for the month of September during my guest design spot with The Shabby Tea Room!  I so enjoyed creating projects each week!  I want to say a grateful thank you to Debbie for inviting me to be the month long guest designer.  It was a wonderful experience!!!  I hope you will join us in the Tea Room this week and make a project using burlap and twine! 

Crafty Hugs,
Jill


Wednesday, September 25, 2013

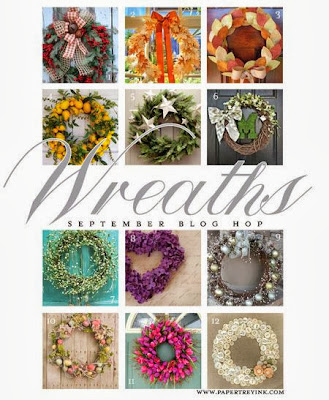
Grateful for YOU! September 2013 Blog Hop - Papertrey Ink


 Hello Friends,
Here with a quick post before the end of this month's Papertrey Ink Blog Hop all about wreaths.  Here is the inspiration photo:


The idea of doing some "bronze" embossing onto book paper with Wreath for All Seasons came into my head and I ended up making two similar cards.  

The sentiment is from Basket of Blessings.  
Thanks for taking a look at my cards.  I couldn't decide about the twine bow on the wreath so I made one with and one without. :)

Jill

Tuesday, September 24, 2013

Wishing you a cozy hoiliday season....a card for Make it Monday!


Hello,
I finally found some time to participate in a Make it Monday challenge again.  This week's video is all about creating a flocked look with dimensional paste.  Danielle made her very first "Make it Monday" video this week demonstrating this fun technique.  Thanks Danielle!!!

 I have 4 different card fronts created to try this technique on.  I do have one cover plate die from PTI but I wanted to experiment with another idea.  This first card that I am showing today is using a stencil I created from various dies in my collection - many of them from PTI.  I also added some hole punches in a heart shape and small circle shape. I think if I do this again I will add a whole bunch more of the tiny holes as I love the effect it gives!  Great for snow!!!
 Here is a picture of the stencil I created for my paste:


 This picture (below) is blurry as I was moving the spatula when I took it.  I found that the spatula from my Stamp-a-faire kit works GREAT at layering molding paste through both the paper die-cut stencils and any plastic one's you may have on hand.

Here you can see the 4 card fronts I created on Monday morning....sorry the picture quality is so bad.  My craft studio is in my basement and it was a dark and rainy morning:
The top left is the card front created with my hand-made stencil.  The bottom right is a Christy Tomlinsen (sp?) stencil and the other two are from a Simon Says Stamp stencil.    I used both a Shimmerz Texturz paste in "Patina" which is a light aqua color and some Aleene's Glitter Snow Paste that I had on hand to make these 4 card fronts.

 Here is one more view of the card I made:

And a close-up of the sentiment panel which was heat-embossed with some red glitter embossing powder I had on hand.  
 
 I added a little red gingham heart to the snowflake at the top as I thought it was perfect with this sentiment.  And I just love gingham - especially red gingham at Christmas time!!!!  The PTI stamp set I used is called "Happiest of Holidays" 

Thanks for taking a look at my card!  I hope to find some time to work on the other cards too - we will see how my weeks goes.  I am looking forward to seeing what everyone does with this technique!

:) Jill

Monday, September 23, 2013

Family Birthday Celebration....

Hello Friends,
Just here with a quick post of some birthday cards.  My Dad turns 75 this week!  He is such a great Father!  He and my Mother raised 7 children and are a wonderful example to all of us in all areas of life!  Most of all in how to lead a strong Christian life walking closely with God and loving everyone 20 feet around us each day.  I am so blessed to have them as my parents!  Happy 75th Birthday Dad!!!  I love you bunches!

We had a wonderful family birthday celebration this past weekend for my Dad and for my niece and nephew too.  Here are the 3 cards that I put together.  They are all similar because I had a limited amount of design time and was sick as a dog with a horrible cold when I was trying to get them made! 

This card was given to my nephew:

 This one was for my Dad - I wanted it to be bright and festive so I went with red, white, and turquoise for the colors:


And this last card was given to my niece:


The birthday themed dies that I used are from Taylored Expressions.  I love how fast these cards came together! 

Thanks for taking a look!
:) Jill

Sunday, September 22, 2013

You are the most wonderful TEACHER!

Hello Friends,
Here with another post as the September Month-long guest designer at The Shabby Tea Room.  Here is this week's inspiration photo:

The Shabby Tea Room - Week #185 "The Splendor of Fall" - create a card or project with an apple theme.
I was so excited to make a project with an apple theme.  I decided to make a Fall card as well as a teacher gift set.

This is a gift set I can give to my son's homeroom teacher later this year for either the Holidays or for Teacher Appreciation Day.  I used the same apple motif on both the card and the felt hanging ornament.  The ornament has a twine hanger attached at the back which doesn't show in this photo.
The ornament is made out of felt and canvas and half of a small doily.  I used the Paper Sweeties stamp set called "You are the most Wonderful" for the sentiment.  The book image with the apple on top is from the set  "So Proud of You".  

 A close up of the card by itself:
 And the sweet apple charm I added to the twine bow:
And here is the "Fall" card which uses Paper Sweeties "Emma" stamp set as well as "Stand Add-on #2" and "So Proud of You".
I stamped a row of the sweet sunflowers and colored them with copics and then added my fence on top of them so they could just peek out over the top.  I then cut one sunflower out and posed it next to Emma in front of the fence.  I added some pretty bow gems to her hair as she is obviously all dressed up for her first day of school!  I am still trying to decide if I want to put a "Back to School" sentiment on here or just leave it as is.  I also added just a touch of "diamond" stickles to the flowers, apples,pumpkins and the bird for a little bit of sparkle!  Inside the card it says "Happy Fall Y'all". 

Thanks so much for taking a look at my guest design post this week for the Tea Room.  I so appreciate everyone's sweet comments on my projects!  I am having fun and I hope you are too!  I hope that you will make an apple themed card or project to play along with us!

Happy Fall!
:) Jill


Happy Birthday Sharron!!!! This Blog Hop's for YOU!!!!

Stamps and Dies are from Taylored Expressions


Welcome to a very special BIRTHDAY BLOG HOP!

         We are here today to send lots of Happy Birthday wishes to our dear friend Sharron!


Happy Birthday Sharron!!!!


Sweet Sharron blogs at "On Papillion Wings" and you will most definitely enjoy visits you make to her blog as her posts are always filled with beautiful creations! I wish Sharron a wonderful day full of happiness and a year full of many, many blessings!  I so enjoy her cards, her blog, and her sweet comments!  I hope you will visit her blog today and wish her a very Happy Birthday!

I love Sharron's design style and have many of her beautiful cards pinned to my various Pinterest boards.  She has a beautiful CAS style and a way with embellishments and embossed backgrounds that add just the right touch to her cards!   Here is a link to one of her most recent creations that I just love:  see this card!

I want to thank Joyce at "Cards-by-the-Sea" and Cathy at "Empty Nest Crafter" for organizing this lovely Birthday Hop for Sharron.  They are wonderful party planners! Here is a list of the blog hop participants:

Your next stop is at Kara's blog:  KandRDesigns
Have a lovely day!
Big Smiles!
Jill


Sunday, September 15, 2013

Every time a bell rings an Angel gets her wings! Ring! Ring! :)


Hello Friends,
Welcome to another guest design post for The Shabby Team Room.  This week (#184) is all about white!
Here is our inspiration photo:
The Shabby Tea Room - Week #184 - The White Challenge - Create a card using white/cream and neutrals (black, brown, tan, kraft) plus twine.


Aren't those the cutest fabric pumpkins!  And I love the lines on the old style metal garden chair. I have to tell you though that tonight this photo made me think of winter and snow not Autumn and pumpkins.  It may be because we have been having weather in the 90's this week and I am ready for a little bit of cold right about now!!!  LOL!  Yesterday it was so hot that the kids all wanted to play inside in the basement after school to keep cool!  Today was a little bit cooler thank goodness!  :)

 One of my favorite Paper Sweeties stamp sets is called "Christmas Blessings".  I love this set because I am a HUGE fan of the Holiday movie:  "It's A Wonderful Life".  I just LOVE Jimmy Stewart!!!  And in this stamp set there is a sentiment that I just love:  "Every Time a Bell Rings an Angel Gets Her Wings".   I have had it in my head for a while that this would make a wonderful ornament for Christmas time with a matching card.  And the fabric of the pumpkins sitting in the chair inspired me to make my project for this week.

Here is what I came up with:

This photo shows the ornament and the card together.


This photo shows a close-up of the front of the ornament.  I used felt, canvas, twine, an old curtain panel, a piece of an old doily, and some wings with white glitter jingle bells to create the ornament.

This photo shows the sentiment from an old wood-mounted stamp that always sits on my desk "I believe in Angels".  I added this to a canvas heart and placed it on the back of the ornament.  I wanted the back to be pretty too so that both sides would look nice on the Christmas Tree of the person I gift this to.   It also looks cute as a door pillow hanging from a door knob and could be hung with either side facing out.
Here is a picture of the card by itself:

 I paired the sentiment with some hearts and music note paper to depict love and the music that is made when a bell rings!   And of course I had to add some wings with some sparkly white jingle bells covered in glitter and tied on with twine!!!  Each time the card is shaken the recipient can be giving out wings!    And to give texture to this all white/cream card I embossed the main panel with snowflakes and lightly shaded it with some kraft ink.  Then I added my signature "diamond" Stickles as I don't feel that a Holiday card is complete without a little bit of sparkle!!! 

Thanks for taking a peek at my ornament and card!  I hope you will join us in the tea-room for this lovely "White Challenge".  All of the information can be found at The Shabby Tea Room Blog.

Hugs,
Jill


Wednesday, September 11, 2013

Happy Birthday Kara!!!

Happy Birthday Kara!!!


Hello Friends,
Today we are celebrating our wonderful friend Kara's Birthday.  If you are not familiar with Kara and her beautiful cards and projects at her blog: KandRdesigns.blogspot.com you are in for a wonderful treat!  You may visit and find yourself still there an hour later as you page through her gorgeous cards and creations! 

Kara's blog was one of the first that I found when I started playing along with the Papertrey Ink's "Make it Monday" challenges and I was instantly inspired!  She has such a wonderful design style and I always enjoy my visits to her blog and to her Friday Inspiraiton File over on Pinterest.  I am so happy to be able to participate today in a birthday blog hop in her honor.  Happy Birthday Kara!  Thanks for all of the inspiration that you provide to me and so many others!  You are a sweetheart!  

In Kara's honor I used my Impression Obsession "cake slice" die for the first time.  It has been sadly neglected since I purchased it and this was the perfect excuse to put it to a very good use!!  
 
I also had to decorate the inside of Kara's card:


I want to thank Joyce for organizing this lovely Birthday hop for Kara!  Here is the list of everyone participating in today's hop in case you get lost along the way:

Joyce
 Cathy
Tracey

I am sending you on to the lovely and talented Kelly G's blog "Notable Nest".

Happy Birthday Kara!  I cannot wait to hop around myself and look at all of the lovely birthday goodness that will be posted in your honor!  Each of these ladies is an inspiration to me!!!
Hugs,
Jill


Sunday, September 8, 2013

Happy Anniversary...a card for The Shabby Tea Room - week #183 - "Time Flies"


Hello Friends,
Today I am thrilled to be here with my second post as Guest Designer for the month of September 2013 over at The Shabby Tea Room.  The theme this week is "Time Flies" and this is the inspiration photo:  
The Shabby Tea Room - Week #183 - "Time Flies"

We were asked to create a card or project that includes a clock image. 
I embossed a "clock" background stamp in silver on a 4" circle diecut for the focal point of my card.  Then I embossed the beautiful couple stamp from the Paper Sweeties - "Live, Love, Laugh" stamp set in silver and fussy cut them out.  I inked the edges and background of this piece with some aqua mist and smokey shadow inks.  The Tupelo Circle "wreath" is a Memory Box die that I cut from smokey shadow card-stock. I cut it twice and cut the second wreath apart to use as leaves with my Prima flowers.  The "Happy Anniversary" sentiment is from the same Paper Sweeties stamp set.  

Thanks for looking at my card.  I hope you will join in the fun at the tea room this week!
Crafty Hugs,
Jill


Saturday, September 7, 2013

Make It Monday #130: Using Heat N' Bond to Make Fabric Die Cuts

Happy Weekend!  It is Saturday today and I have been playing last night and this morning at using Heat N' Bond to make fabric die cuts so I could participate in the Make it Monday Challenge #130 over at Nichole Heady's Blog "Capture the Moment" for Papertrey Ink.

I had my lovely tea-stained fabric all ready to be used from Stamp-A-Faire thanks to a lovely tutorial I watched from Melissa Phillips.  I made several different die cuts with the fabric and ended up using a cupcake die cut on the front of a card to make a birthday ensemble.  Here is what I came up with:


The tea-stained fabric was die-cut and then attached to the card base made with Papertrey Ink's Shape-Up Series Cupcake Die Collection.  I then added some book-paper roses, paper and crocheted doily pieces, some leaves, buttons, floss, diecut border and a tag to finish it off. 

Next I worked on altering a burlap bag and making a small envelope to hold either a pair of earrings or a gift card for one of my sisters birthdays in the coming months. 


I used a lot of the same items and also created a double-layered tag with a flower button, floss bow, and key charms on the floss strands to decorate them up a bit.  The base layer is some lovely cream colored felt which I diecut with a scalloped rectangle die.

And finally to insert in the bag the little envelope:
Well that is it for me for crafting today.  It has been a busy week and we are off to the school picnic this evening at a local park to welcome everyone back to school.  Tim made it through the first 1/2 week of 3rd Grade and so did I!  :) LOL!  Here are some pictures of his first day taken on our front porch right before we left Wednesday morning:


He surely is the light of my life and I am so proud of him!!!!  I forgot to make him his first day of school card for his lunch box so I ran downstairs and made this in less than a minute...you can tell too...but it is the thought that counts!  :)

Thanks for visiting my little blog!  Happy Crafting and Back-to-School time!
Hugs,
Jill